Learn

Learn About Redi Shade Products
Redi Shade helps you make the smartest choice for your window coverings by providing a full range of high quality options — all with a No Tools approach to installation.
Get the information you need as you begin to explore our offerings. Understand the key features that drive our innovative products, and get a sense of the benefits you’ll enjoy with Redi Shade.
No Tools Installation
Measure & Install Easy Lift Shades
Clean the mounting surface with alcohol before installing the shade and allow it to dry.

1. Measure
With a tape measure, measure the window’s width in 3 locations. Use the smallest measurement.

2. Trim
Remove the bottom rail end caps. Place the cutting guide at the exact desired width. (No clearance deduction needed; it’s already included). Trim each side of the shade to that same exact window measurement. Position the knife blade at an angle on the top of the shade at your exact measurement. Press firmly cutting through rails and fabric with a rocking motion and constant pressure. Replace the end caps on the bottom rail.

3. Peel
Peel the adhesive liner.

4. Stick
Press firmly for 30 seconds across the width of the shade to install it. Please allow 30 minutes for the adhesive to cure before operating the shade. Pull the shade down to lower it or push the shade up to raise it.

If your shade becomes unbalanced and hangs unevenly, open gently to full length to reset.
Measure & Install Original Shades
Clean the mounting surface with alcohol before installing the shade and allow it to dry.

1. Measure
With a tape measure, measure the window’s width in 3 locations. Use the smallest measurement.
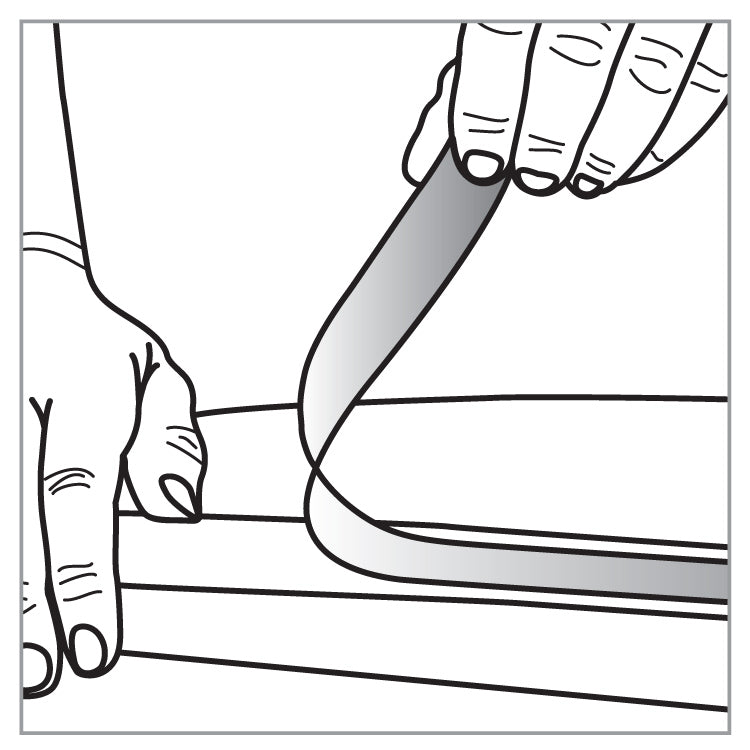
2. Trim
Trim the ends of your shade to fit the window using a knife.

3. Peel
Peel the liner.
4. Stick
Press firmly for 30 seconds across the width of the shade to install it. Then, allow 30 minutes for the adhesive to cure before operating the shade. You can overlap two or more shades for larger size windows. Use the included clips to raise and lower the shade.

Measure & Install Original Arch Shades
We’ve updated the way our Original Arch shades are measured to better fit your window. To determine whether you’ve purchased Original Arch Shade Version 1 or Original Arch Shade Version 2, take a look at the patented trimming scale on the side of the arch. Locate the area of the trimming guide to the left of the ruler.
|
If your trimming guide looks like this: you are using Original Arch Shade Version 1, follow the instructions for measuring and installing here.
|
If your trimming guide looks like this: you are using Original Arch Shade Version 2, follow the instructions for measuring and installing listed below.
|


Clean the mounting surface with alcohol before installing the shade and allow it to dry.
1. Measure
Our trimming scale is designed for perfect arches. To determine if your window is a perfect arch, follow these steps: Measure the width (A) and the height (B) to the nearest 1/4” from the inside of the window casing. If the width (A) is exactly double the height (B), you have a perfect arch window.
Example: You have a perfect arch if your window’s width is 30” and its height is 15”. You have an imperfect arch if your window has a width of 30” and a height of 12”.
Once you have confirmed you have a perfect arch, use the trimming scale on the shade to trim your shade.

We do have an Imperfect Arch Guide for slightly imperfect arches, but if you have a significantly wide, narrow, or eyebrow arch, this product may not be for you.
2. Trim
Using the exact width, position a straight edge knife blade on the trimming scale at the line matching your width measurement, then trim your shade. Note: our patented trimming scale already takes into account the clearance deduction for a proper fit inside your window.
Wondering where to place your cut? With the red instruction text on the left, locate the measurement of your window base to the right of the text (example: window base is 38”, trim at the 38” mark).

3. Peel
Peel the liner. Note: Be sure to install the trimmed section with the red instructional text on it rather than the trimmed excess to ensure a proper fit.

4. Stick
Place the shade into the arch holder, then into your window frame. Fan the Original Arch Shade open and position in the window, then stick the shade inside your window frame. Using both hands, press firmly along the bottom pleats.

Here is a video on how to install your Original Arch Shades
Here is a video if you have an imperfect arch window
Shade Types
Shades come in either pleated or cellular construction. Both shade types can look and work similarly and can come in a variety of colors, light controls and styles. Learn about what makes them different below. All Redi Shade window shades are cordless with no tools installation and can work as a stand-alone solution or layer behind existing window treatments for additional sun control while keeping your daytime view and privacy.
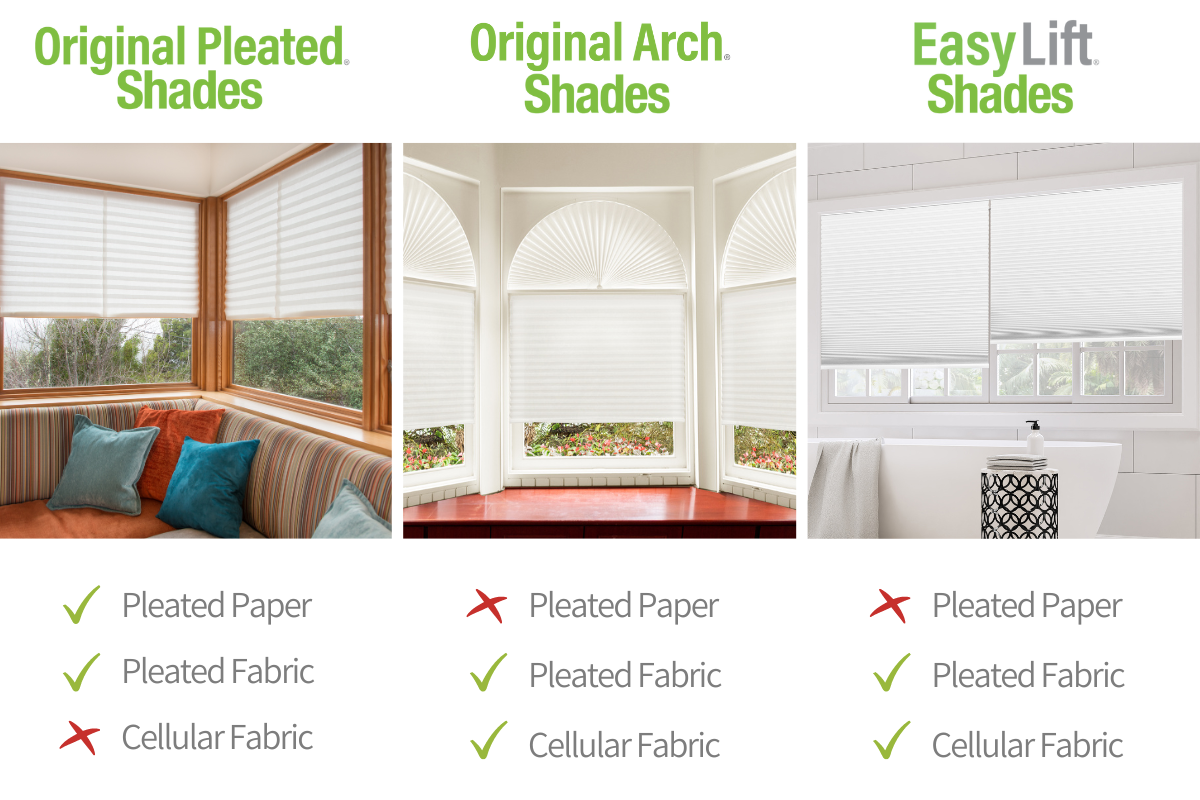
Pleated Shade
Pleated shades are usually made with a single layer of material and have pleats that resemble an accordion. They offer less insulation than cellular shades, but are often more affordable. Pleated shades come in different sizes, materials and colors. They also come in different light controls and privacy options.

Cellular Shade
Cellular shades are often referred to as honeycomb shades because of the way the shade’s cells look from the side. Cellular shades provide maximum insulation and energy efficiency. They can be customizable and come in different sizes, materials, colors, light control and privacy options.

Light Control, Materials, & Colors

Light Control
Dramatically impact the look and feel of a room by understanding the light control and privacy to get the perfect shades. Fabric, depth of color, and number of cells all contribute to how much a shade controls light and privacy. Our blackout shades block nearly 99% of light and provide maximum privacy day or night.
Light Filtering 
Diffuse natural light to preserve the bright warmth of an open window, while maintaining moderate privacy. Light filtering shades are a terrific multi-purpose solution for virtually any room in your home providing UV protection and glare reduction.

Room Darkening 
Dim a room and reduce nighttime shadowing while blocking a majority of sunlight, creating privacy, and providing UV and glare control. These shades work well in bedrooms and children’s rooms.

Light Blocking
Achieve the next level of light control, privacy, UV protection, and heat and glare reduction with light blocking shades. Light blocking shades feature an exclusive composite fabric with heat reflective layer for light blocking and enhanced privacy for rooms that get more sun.

Blackout 
Block light and create maximum privacy. Blackout shades are constructed with an inner cell liner that blocks 99% of all exterior light. A great solution for bedrooms, children’s rooms, movie rooms or for creating a quiet, tranquil space.

Materials & Colors
Our shades come in a variety of materials and colors that look great in any setting. The material of a shade plays a role in the light control, energy efficiency and privacy features the shade can offer. The material and color work together to unify the look of a room, making a statement about the decor and style.
Easy lift Shades
-
Pleated light filtering is made of 1 1/4” spunbond non-woven polyester fabric.
-
Pleated light blocking is made of 1 1/4” composite non-woven polyester fabric with a heat reflective laminate layer.

-
Cellular light filtering is made with 9/16” spun lace non-woven polyester fabric.
-
Cellular blackout is made of 9/16” composite spunbond non-woven polyester fabric with heat reflective layers.
*Natural cellular fabrics are white color to street side.

Original Shades
-
Pleated paper Original shades are available in light filtering, room darkening and blackout. They are made of durable paper that will not yellow and crack from sun exposure.
-
Pleated light filtering fabric is made of 100% non-woven polyester fabric.

Original Arch Shades
-
Pleated light filtering is made of 100% non-woven polyester fabric.
-
Pleated light blocking fabric is made of composite non-woven polyester fabric with a heat reflective layer that helps block heat entering through windows.
-
Cellular light filtering is made of 100% non-woven spunlace polyester fabric.

Always Cordless
No tangles, no mess, no worries. Redi Shade Window Shades make a statement for both fashion and safety. All Redi Shade window shades include cordless operation as a standard feature to ensure they always provide maximum safety, ease of use, and a clean, cord-free appearance.
Cordless Shades
Easy Lift shades raise and lower with the bottom rail.
Original shades raise and lower with the included clips.
Redi Shade’s Original, Original Arch, and Easy Lift shades are all Best for Kids certified and are all tested and certified as child safe.

Energy Efficiency
Having a window shade of any kind is the first step to creating more energy efficiency in a room. By covering your window you are controlling your energy costs.
Redi Shade’s Energy Efficient Shades
Easy Lift cellular blackout shades are our most energy efficient shades. They feature 9/16-inch blackout honeycomb fabric that blocks 99% of sunlight, reducing heat gain and providing maximum UV protection to help block heat out in the summer months and keep the cold out in the winter months.
(beauty shot)
Easy Lift cellular light filtering shades are created with a 9/16-inch honeycomb fabric that filters sunlight allowing the fabric cells to trap air and help keep your room warmer in the winter, and cooler in the summer, conserving energy.
(beauty shot)
Easy Lift pleated light blocking shades feature an exclusive composite fabric with heat reflective layer for light blocking and heat reduction.
(beauty shot)
Easy Lift pleated light filtering shades feature a layer of fabric that lets a little more light in, while also filtering the heat and cold out.
Original Arch pleated shades are the perfect energy efficient solution for your half-round arch windows so that they can help in energy savings too. They are equivalent to the Easy Lift pleated shades noted above.
Original pleated shades can also assist in energy efficiency with the blackout shades being most energy efficient from this line, followed by room darkening and then light filtering.
Specifications
Easy Lift Specifications
Included with shade
-
Patented Trimming Scale: no clearance deductions needed, trim to desired width
-
Patented Trimming Guide: ensures a straight cut and assists with trimming
Sizing
-
Trim the shade with 3-1/2” sharp straight edged kitchen knife
-
Shade length: 64”
-
Provided coverage for width sizes from 30” to 60”:
-
30” W x 64” L – Fits windows 19” to 30” wide (Actual width is 29 3/4”)
-
36” W x 64” L – Fits windows 19” to 36” wide (Actual width is 35 3/4”)
-
48” W x 64” L – Fits windows 31” to 48” wide (Actual width is 47 3/4”)
-
60” W x 64” L – Fits windows 43” to 60” wide (Actual width is 59 3/4“)
-
*60” width is not available in pleated light blocking fabric
-
Cleaning
Lightly dust or vacuum with upholstery attachment. For spot cleaning lightly blot with mild detergent and warm water. The shade is not intended for dry cleaning, spot removers, strong detergent or full water immersion.
Caution
Please do not hang Redi Shade window shades close or near flames (candles, heaters, etc).
Original Shade Specifications
Included with shade
-
Clips to raise and lower the shade
Sizing
-
To trim, use a utility knife or a sharp kitchen knife
-
For larger windows overlap two or more shades
-
Shade sizes that you trim to fit your window:
-
36”W x 72”L
-
48”W x 72”L
-
48”W x 90”L (available in pleated paper light filtering white only)
-
Cleaning
Lightly dust and/or vacuum the shade with upholstery attachment. Do not use water to clean the Original paper shades.
Caution
Adhesive is not recommended for use on varnished, lacquered, or freshly painted surfaces. Do not use it on wallpaper. If in doubt, test before using.
Please do not hang Redi Shade window shades close or near flames (candles, heaters, etc).
Original Arch Specifications
Included with shade
-
Patented trimming scale (comes on the shade)
-
Patented arch holder
Sizing
Trim the shade to fit any size up to 72”W x 36”L
Cleaning
Lightly dust or vacuum with upholstery attachment. For spot cleaning lightly blot with mild detergent and warm water. The shade is not intended for dry cleaning, spot removers, strong detergent or full water immersion.
Caution
Please do not hang Redi Shade window shades close or near flames (candles, heaters, etc).
Simple Slide Roller Brackets Specifications
Included with brackets
-
Level template to assist with installation