

Kid Friendly DIY Halloween Shade
Looking for an easy Halloween craft to do with your kids? We’ve got you covered. Our DIY Halloween Original Shade is a fun, quick and easy way to spruce up your windows for this spooky season!
What You Will Need:
– 1 36” or 48” Original Blackout Shade (black)
– 1 36” or 48” Original Light Filtering Shade (white)
– Halloween themed stencils (we used ghost and bat ones)
– Halloween themed stickers
– Metallic markers (show up better on dark shades)
– Spider webbing (optional)
– Spider (optional)
– Scissors – to cut shapes
– Glue gun or any other glue
– Tape measure
– Utility knife or sharp kitchen knife
– Craft cutting tool (optional but helpful for more precise cuts with stencils)
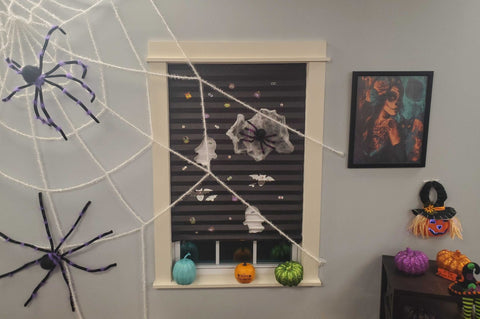
Steps1. First, begin by measuring the width of the window you will be placing your Halloween shade on and cut the Original shade per the instructions. 2. Next, flatten the shade and use a metallic marker to draw out the stencils. Using scissors (or a craft cutting tool) cut out the stencil shapes on the black Original shade. We used a ghost stencil, and cut it out from the shade, and then with a silver marker outlined the ghost. |
|


|
|
3. Then use stencils to draw in shapes. With a bat stencil and silver marker, we drew and colored in pairs of bats. Pro Tip: Use metallic markers when decorating your shade. Metallic shows up better on the dark paper. 4. Then take some webbing and pull it apart to create a wider web. Glue the webbing down with a hot glue gun or any glue you prefer. |


|
5. Then add stickers! We used some Halloween-monster themed ones to add more color to the shade. We also added googly-eyed stickers to make the ghosts and bats come to life. 6. Let your shade dry. This will give any glue or paint time to set before installation. 7. In addition, you’ll want to re-pleat your shade slowly. This will give the shade its shape back and make it easier to install. Then we glued in the spider. |
|


Pro Tip: If you plan to add a spider to the web or any heavier decorations to the shade, it’s recommended to use a glue gun or stronger glue to ensure the decorations stay adhered to the shade.
8. Lastly, install the shade. Before installing, clean the surface of the window with an alcohol wipe and microfiber cloth to ensure that the surface is clean and smooth. Install the blackout shade with the decorated side facing away from you (inside the window). Install the white Original shade directly on top of the blackout shade to layer both. Press firmly on the shade for 15-30 seconds to ensure that the adhesive adheres properly.
Pro Tip: To have an orange (or any other color) and black theme, you can get spray paint and paint the white Original Shade that color. This will give the background a different color rather than white.
Pro Tip: For future re-use, we recommend using velcro strips for an easy way to swap out any of your holiday themed shades. Simply install the velcro strip to the surface of your top window sill. Use the opposite side to add onto your holiday themed shades. Switch as needed.
It’s as easy as that. Remember to have fun. This is your Halloween DIY shade so feel free to use any type of decorations you’d like to decorate it to your liking. We’d love to see your DIY Halloween shades in action. Be sure to tag us on social media.
Check out our Amazon Live video here if you’d like to watch the craft.
Happy Halloween!